
Wednesday, June 22, 2016
Since completing the guitar, described in detail in the original blog, I have continued to build, albeit at a gradual pace. I recall Chuck Gilbert saying that in order to build a guitar you have to first build your process and indeed, that has been an important aspect of my further endeavors. To begin with there are a few foundational principles. My goal is not to build guitars with the goal of selling them. That would be a tall order in these times when factory built guitars, having benefitted from advances in technology such as CNC processes and new finishing techniques represent better value for money than ever. On the other hand there has also been a renaissance in custom building resulting in a burst in innovation (side ports, arm bevels, wedge bodies, fan frets) and a healthy supply of guitars built by individual luthiers, or small shops.
Wednesday, September 2, 2009
The Finish


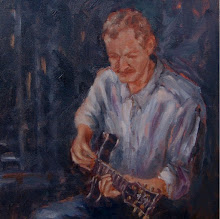
I have added a photograph of the guitar some eight months after it was made. The spruce top has darkened considerably as the guitar ages. The difference in color is evident from comparison between the new photograph and those below. The sound has improved as the structure stabilizes and the guitar responds to regular playing.
The guitar is completed. Chuck did an excellent job of applying a lacquer finish. This, a time consuming process, involved sealing the grain, sanding, applying wash coats of sealer then several build coats of lacquer. These are allowed to cure, then leveled. Additional coats are applied and the curing and leveling process repeated followed by the final rub out and polishing. The neck is left with a satin finish which is pleasant to the touch.
The outcome can be seen in the photographs (double click to enlarge). Chuck is a perfectionist and went to a lot of trouble to achieve a high quality outcome. He took extra care to drop fill a section of the purfling that was absorbing lacquer, followed by a repeat of part of the build and leveling process. I think he takes almost as much pride in this guitar as I do.
Having had some time to play and examine the guitar I am very pleased with the outcome. The woods are not exotic by any means, and the slightly knotty grain in the mahogany back and gently curved grain in the sides might not conform to the unblemished symmetry which is popular in commercial guitars. However, they reflect personal choices and together with the transparent natural finish contribute to the instrument's unique character. Tonally it is the equal of several high quality acoustic guitars I have acquired over the years and will improve with time as the woods settle and the act of playing enhances the instruments resonance. I am pleasantly surprised with what I was able to achieve at a first attempt. Chuck's process and guidance helped me build to a standard that would otherwise have required many attempts and a gradual learning curve. Instead I was able to concentrate on the fundamental skills required at each stage. Could I do better and will I build another guitar? That remains to be seen. For the time being I am looking forward to enjoying a fine instrument with special significance. All that remains now if for me to design a label and glue that inside the soundbox of the guitar. I'll probably wait until I'm putting on a fresh set of strings.
I have included a low resolution video of me playing the guitar. The tune is Si Bheag, Si Mhor, by the 17th Century Irish Harpist, Turlough O'Carolan. This one's for Seamus.
Sunday, July 19, 2009

Reflections and such.
It has been a very interesting and fulfilling two weeks. The 80 hours or so I spent on this project was as focused and intense an activity as any I've engaged in in quite a while. There were few distractions and the detailed work demanded a high level of concentration. Unlike much of the work I have done during my career, this endeavor results in a visible, tangible product which will also have a unique musical voice. It's a lot of things coming together in a very holistic fashion and it has brought closure to something I dabbled in over thirty years ago. Working with wood is both challenging and satisfying. Process and precision are the foundation, however, feel and a good eye are key aspects to the quality of the outcome. I know that playing a guitar which I've built myself will add to the enjoyment.
That a lot was achieved owes much to Chuck's support. He has the experience of having built some 25 guitars but beyond that his approach is that of an engineer. He is process oriented. He measures, thinks and makes adjustments to the process with the result that I encountered no serious oversights or setbacks. He was patient and open with his advice and access to his tools, even his fine quality chisels.
Chuck clearly has a passion for what he does. He studies guitar building and has taken a workshop class from Charles Fox, a renowned luthier in Portland, Oregon. He exchanges ideas with other luthiers including Howard Klepper and Kent Everett (see links below).
I came across Chuck's offer to steer someone through the process of building a guitar on Craig's list. I was fortunate to be in a position to be able to dedicate two weeks of my time and as mentioned above, it was full time work for those two weeks. I worked one short day because of a prior business commitment, however, I worked two long days to make up for it.
If you are interested in finding out more about Chuck's guitars or taking a construction class similar to that described in my blog, he can be contacted at:
cg3167@swbell.net
Links to other luthiers:
Friday, July 17, 2009


Day 10: From now on it will only get better
I took the guitar home yesterday evening in its temporarily assembled state. This gave me an opportunity to assess it as a complete musical instrument rather than the component parts which I have been working on for almost two weeks. I decided that the neck still doesn't have the perfect feel which I am seeking so in the morning I remove it and go back to carving and shaping. This reduces the thickness in the playing area by a little over a tenth of an inch. The heel and volute must then be modified so that all the compound curves blend together elegantly again. I am very satisfied with the result.
To protect the heel where the neck joins the body, and blend in with the body binding at the point of contact, I add a thin piece of ebony.
The remainder of the time is spent learning and performing detailed set-up work. Chuck's approach is characteristically precise so I take some notes which will allow me to better set up my own guitars. The angle at which the neck joins the body is modified very slightly to change the line of projection from fretboard to bridge. The nut and saddle are modified to adjust the height of individual strings above the fretboard and the truss rod is tensioned to counteract the pull of the strings and impart a very slight curvature to the fretboard to preclude string buzz. When reassembled this time the guitar not only sounds good but plays easily. The construction is essentially finished except for the permanent installation of the bridge. This is left till after the finish is applied.
The quality of the guitar has exceeded my expectations and is worthy of a professional finish so I'm having Chuck do the finishing work for me. This involves several coats of lacquer with waiting periods between times for the lacquer to cure. Multiple sandings, polishing and buffing follow until the body has a high gloss. The neck will be left with a satin finish which is more practical from a playing perspective.
Finishing will take approximately one month. I reluctantly leave the guitar but look forward to seeing the result of Chuck's efforts.
Check in tomorrow for reflections and final comments.
Thursday, July 16, 2009


Day 9: The candle trick, Irish bling and the guitar speaks.
The candle trick is a convincing demonstration of my earlier statement that the binding not only enhances the guitar's appearance but adds to the the structural integrity and sonic efficiency of the soundbox. The trick involves placing a lit candle close to the soundbox and giving the top of the guitar a sharp tap with a knuckle in the area where the bridge will be mounted. Before the binding was installed, this caused the flame to flicker wildly but when the test was repeated this morning the flame was snuffed with ease.
Ornamentation beyond the traditional position dots and sound hole decoration generally consists of the manufacturer's name or logo. I have decided to inlay a simple Celtic knot in the headstock. I mail ordered the knot, hand-cut from abalone in three interlocking pieces. Installation involves routing and carving a corresponding slot in the ebony face plate. This is delicate work and absolute precision is impossible. The small gaps left when the abalone is in place are filled with ebony sawdust and CA glue. When sanded this mix is an almost perfect match with the surrounding ebony. The slight asymmetry resulting from the knot being hand cut adds a certain uniqueness to the overall effect. Tuning machines are installed to complete the headstock.
The guitar's bridge is cut and carved from an ebony blank. Holes are drilled for the strings and bridge pins, and a slot routed for the bone saddle on which the strings will seat. A bone nut is made for the top of the neck and the parts of the guitar are ready for a preliminary assembly and testing. Hollow bolts through the bridge allow the guitar to be strung before the bridge is permanently installed. The stings are fed from inside the soundbox up through the hollow bolts, along the neck over the nut and to the tuners. This temporary configuration allows the guitar to be tuned up to pitch and checked out thoroughly prior to final setup. It is an opportunity to play the guitar. Chuck and I try it out. The guitar is light and responsive. Volume sustain and tone are excellent. Even in its unfinished state it is evident that I have the makings of a very high quality guitar. We are well pleased.
The major structural tasks are all completed and tomorrow will be spent making minor adjustments. I will again be in the enviable position of being able to tweak the guitar to suit personal preferences.
Wednesday, July 15, 2009


Day 8: Fitting and fretting.
Chuck's guitar building process is an exacting one, designed to produce repeatable results. The various jigs and templates used during the separate construction of the body and neck help ensure that when joined, they are aligned in the intended manner. The fundamental fit must be close. There is some room for adjustment but not much. This is further complicated by the fact that the end and top of the guitar are curved where the neck will be attached.
The top is sanded flat where the fretboard extension will lie and a mortice recess routed to accept the fretboard extension block. The heel of the neck is marked and chiseled to the shape and angle needed for a snug fit with the body and holes are bored for threaded inserts for bolts. Most builders now use bolt on necks which can be easily adjusted throughout the life of the guitar. Traditional glued dovetail joints tend to gradually shift with time and a neck reset in this case is a major repair task. High temperature softens glue and with the constant tension from the strings, a slight shift in the set of the neck over time can result in the guitar's action or playability being compromised. According to Chuck, one hour at 120 degrees can destroy a guitar, a situation which could easily occur if it is left in a car trunk in summer in Texas.
The neck is bolted onto the body for the first time of many checks and minor adjustments. A jig is used to check alignment between the axis of the neck and the center line of the body - it is good. A straight edge is used to project the line of fretboard to a temporarily attached bridge to ensure that the tilt of the neck is accurate so that the 'action', the relationship between strings, fretboard and bridge can be set to close tolerances. The parts are disassembled and minor adjustments made with chisel and sandpaper until everything fits just right.
Now it's time to put the nickel silver frets in the fretboard. Here again Chuck doesn't do things by half. His approach involves filing and polishing the fret ends to a hemispherical shape rather than the more common flat taper. This involves cutting and preparing the frets to an accuracy of 0.005" before hammering them into the fretboard. Because of the taper of the fretboard, each one is different so this is a slow process which takes me approximately six hours.
Finally the neck is bolted to the body, this time just for effect. It's beginning to look like a guitar!
Tuesday, July 14, 2009


Day 7: Painstaking purfling and banding
Several aspects of guitar design combine aesthetic and functional purpose. The edges of the soundbox would be vulnerable to damage, particularly the relatively soft spruce top. Most guitar soundboxes are therefore trimmed with a harder material, generally plastic or wood. The hard edging not only protects the guitar but enhances the resonance by reflecting vibrations, thus increasing the length of time a note is sustained. More elaborate guitars often have ornamental strips of purfling adjacent to the binding. Thin strips of different colored woods are traditional although some high-end guitars have more intricate marquetry inlays or abalone shell.
Chuck's recent designs include an ebony banding strip and purfling made of thin laminated strips of contrasting ebony and maple for an elegant, traditional look.
Fitting the banding and purfling is painstaking work. First grooves of the required depth and profile are routed around the top and bottom of the soundbox. The first strip of purfling is then dry fitted and tacked with CA adhesive to hold it in place. The banding and the top strip of purfling are then dry fitted and taped in place. This involves some delicate work to ensure that the ends fit neatly, including some small miter joints where the horizontal purfling intersects the bands of purfling previously fitted alongside the tapered ebony end graft (double-click on the second from bottom photograph to see detail).
Once everything has been carefully fitted and taped, the trim is glued. Cleanup involves sanding and scraping the binding and purfling till it is flush with the sides, top and bottom of the body. Finishing will further enhance the appearance, however even in its unfinished state, the effect is pleasing. This is the most intricate piece of carpentry I have ever attempted.
Subscribe to:
Posts (Atom)