Monday, July 13, 2009


Day 6: Getting to grips with the neck.

The neck is a key structural component and must, for the life of the guitar, bear a constant 100 pounds or so of pull from tuned strings. It is also the primary area of physical contact between the player and the instrument.

I have several guitars. No two necks are the same. Some are wider than others, some thicker, different cross-sectional profiles, different shapes where the neck joins the body and headstock and so on. Over a period of a few days I can adjust to a particular neck and feel comfortable with it, however, today I have an opportunity to create the perfect neck. One which is a natural and unique fit to the size and shape of my left hand. One which requires no mental adjustment or compromise on my part. It remains to be seen if my carving skills are up to the task and my ability to judge when the neck 'feels' right.

The work begins with rough carving of the neck blank to which the fretboard and headstock veneer have been glued. Measurements and templates are used to establish some approximate dimensions at three points along the neck which allows for fairly aggressive removal of wood between with spokeshave and rasp. As the work progresses small planes and chisels are used and gradually the hand tools give way to sandpaper wrapped round blocks of wood and dowels of various sizes.

The heel of the guitar, where it will join the body, is carved such that the functional part of the neck transitions into a graceful ornamental shape consistent with the overall dimensions and style of the instrument. The laminated center strip serves as a guide to symmetry. At the headstock end, a volute or raised shape is carved for reasons both aesthetic and functional. It adds visual balance and provides the player with tangible indication of the location of the first fret. It also adds strength to an inherently vulnerable part of the guitar where the angled headstock meets the narrowest part of the neck.

When approaching the desired shape, touch replaces sight as the primary means of assessing and making minor adjustments. It feels good. I look forward to checking it with a fresh mind in the morning to see how close I am to having achieved my goal.



Friday, July 10, 2009


Day 5: Look no hands!

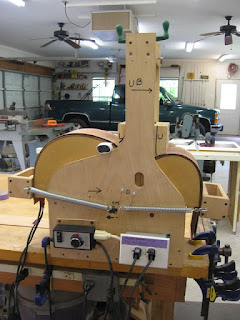
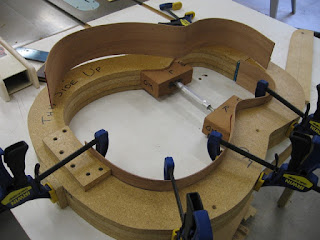
Of the many jigs and devices Chuck has built to facilitate the guitar construction process the vacuum powered ones are perhaps the most impressive. To glue the back and sides together the back is placed against a rubber gasket in a concave piece of MDF which conforms to the built-in curvature. A vacuum pump below the bench is turned on and as the air is evacuated the back becomes firmly held in the jig. The sides are then glued and clamped in place. The jig is a convenient height so the clamps slip neatly under the assembly. If you look closely at the bottom of this first photograph you'll see a round rubber gasket in a wooden plate on the side of the bench. This is another of these vacuum jigs. More on this later.

The process for the front is similar. It is placed in the jig and after one last examination and final clean up of the inside work, the back and sides are glued and clamped on top. The sound box is now closed and any future access will have to be through the sound hole.

While the glue is setting, the fretboard is drilled for the small abalone dots which will help the player navigate the scale. The neck blank consists of a laminated block of mahogany and maple which adds strength and will result in an attractive skunk stripe down the back. This will prove a useful guide to symmetry when carving the neck to shape.

The neck is further strengthened by adding two strips of carbon fiber for stiffness and an adjustable truss rod which, by means of a nut at the end, can be placed in tension or compression and thereby impart a slight curvature to the neck. This is used to balance the permanent tension from the strings resulting in a slimmer more elegant neck.

When the glue has hardened on the sound box the edges are trimmed on a table router and it is placed against the vertical vacuum jig mentioned above. When the pump is turned on it is held firmly in the desired position for sanding or chisel work. No clamps, no vices, no slips. It's almost as good as a second pair of hands.

Back to the neck. After the truss rod is glued in place with a wooden gusset above it to hold it in the groove, the surplus wood is chiseled off and the fretboard and carbon strips are glued in place.

The guitar now consists of two components rather than the multiple pieces of wood of five days ago. There are crucial stages still ahead, however, I am pleased with progress and the process in general is working well. Chuck's approach is to explain the tasks and where necessary demonstrate the skills needed for each stage. In pointing out some of the pitfalls, he often says "ask me how I know". He gives me the benefit of his knowledge and experience and the use of the many clever jigs and devices so I can concentrate on the quality of my work. Although I haven't used hand tools for a long time, my intrinsic skills are proving to be up to the challenges faced so far and are improving with practice. Carving the neck will put my skills to the test.


Thursday, July 9, 2009


Day 4: The Fretboard - where the action is

Today was a short day so I set the soundbox aside and started work on the fretboard. The fretboard has to stand up to contact from fingers and steel strings, including the sideways bending of strings to achieve vibrato or a change in the pitch of a played note. The latter effect is characteristic of blues guitar. The fretboard material must therefore be hard and durable. Ebony and rosewood are the traditional choices. I selected one of three available African ebony blanks based upon subtle grain patterns and color variations which can only be seen upon close inspection.

Precise positioning of the frets is important, otherwise the guitar will not play in tune up and down the neck. The scale length in this case is going to be 25.4", and Chuck has a jig which is used to ensure the exact spacing required when cutting the slots in the fretboard. The ebony blank is stuck to the underside of a plexiglass template with two sided tape. This is placed on the jig which is then slid over the table saw with a 0.025 blade set to a height which will cut a slot part way through the fretboard. The plexiglass template is then shifted until the next notch mates with a pin on the jig and the process is repeated until all the slots are cut.

The sides of the fretboard are cut to a taper and small strips of ebony glued to each side so that the slots are not visible at the edges of the fretboard. This will give a pleasant smoothness and feel to the edges of the finished fretboard.

Classic guitar fretboards are flat, steel string guitar fretboards generally have a gentle curvature to them. Chuck doesn't do things by half. He makes fretboards with a compound curvature - 12" radius at the narrow end and 16" at the wide end. He has another jig for this of course. The fretboard is mounted on a cradle with double sided tape. This cradle rolls on two pieces of wood with the necessary curvature and a hand held router makes several passes over the fretboard as the cradle is moved and locked incrementally across the jig. When finished the fretboard has the desired curvature and the ebony bindings on the sides have blended in so that the fret slots appear to start and end within the fretboard.

Wednesday, July 8, 2009


Day 3: Sharp tools and a feel for the grain.

There's a knack to sharpening a chisel and indeed to knowing when it needs another touch on the sharpening stone to restore its edge. Good chisels take a good edge and hold it longer. Chuck has a neat trick for quickly honing a chisel. He makes a few passes on the sharpening stone and finishes off by holding the edge against a small buffing wheel with some polishing compound on it. It's quick and very effective.

Mass is the enemy of vibration so today's objective was to remove as much of the mass of the strengthening bars and struts as possible. In the case of the guitar back, which reflects and amplifies sound, the approach is to scallop the ends of the struts where they will meet the sides of the guitar, thus leaving the back freer to vibrate. More wood is removed by carving the struts to a parabolic cross section. This all involves a good deal of feel and individual judgement as to symmetry and aesthetics. It is finished when it looks and feels 'right'.

The process for the front is more sophisticated, since this is where the guitar's tone and timbre are generated. Front bracing patterns have been developed over the years largely on an empirical basis. Most classical guitars follow the designs developed by Antonio de Torres a nineteenth century builder who is as revered among classical guitarists as Antonio Stradavari is among violinists. Steel string guitars generally borrow from designs developed by Christian Fredrick Martin which also date back to the early nineteenth century.

The front braces and tone bars are scalloped. The idea is to leave mass in areas of the sound board where there are natural nodes or areas of little vibration and remove as much mass as possible from parts of the soundboard that are trying to vibrate. This is a trial and error approach. Chuck knows from prior art and his own experience of guitar building roughly where the nodes or dead spots are likely to be. I leave the bars high at these spots and remove wood between them. We check progress by holding the soundboard between finger and thumb and tapping it in the vicinity of the bridge plate. As wood is removed, the sound becomes clearer, more musical and sustains longer. Wood is removed and the results assessed until further removal seems to have little effect. This is called voicing the guitar.

Since the front and back of the guitar were built to curvatures of 25' and 12' respectively, the top and bottom of the sides must conform to the same curvatures to ensure a good fit and a structurally strong soundbox. The same dished pieces of MDF (medium density fiberboard) are used, this time with a sheet of coarse sandpaper in place. The edges of the sides are chalked and sanded until all the chalk is removed.

To finish off the struts, both front and back, the ends are shaved down or feathered so that they give the appearance of disappearing at the points of intersection with the sides. It's a tricky process. Fortunately I've had a good deal of carving practice by this time so the delicate work proceeds without mishap. The results are subjected to the 'paper test'. A piece of paper is slipped under the side of the guitar adjacent to the strut. Gentle pressure is applied to the side above the strut and the paper should be held firmly indicating that there is full contact between back and sides at that point.

After some sanding the three primary sound box components are completed and ready for assembly. My Marples Sheffield steel chisels were put to good use today. They have waited a long time to fulfill the purpose for which they were bought in Belfast over thirty years ago.

Tuesday, July 7, 2009


Day 2: Jigs and Go-bars

  • How many luthiers does it take to change a light bulb?
  • Just one, however, he has to build a jig first.
Building a guitar is an interesting balance of precision and feel. One of the advantages of working with Chuck is that he has the knowledge and equipment needed to ensure precision at crucial stages in the process. Feel is still required however. Wood has a character of its own and there are unique aspects of grain, shape and thickness which will contribute to the strength and tone of the guitar. Subtle adjustments are ultimately made based upon feel.

Today's work consisted of adding strength to the three main components in the sound box. The sides are strengthened by gluing kerfed strips of cedar along the top and bottom edges. The kerfs, or saw cuts which go most of the way through the lining, allow it to conform to the shape of the body. Thin vertical strips of mahogany are added to provide additional strength and rigidity. The result is a very light but strong perimeter for the soundbox.

The front and back of the guitar will be braced to add strength. A precise curvature is introduced at this stage; with a 25' radius in the case of the soundboard and a tighter 12' radius for the back. This is where the jigs and go-bars come into play. The strips of wood which will be used as braces and tone bars are shaped to conform to the appropriate radius. Chuck has build a few jigs and templates which when used with the table router, impart the desired curvature. The gluing is performed on a go-bar deck which consists of a piece of medium fiber board with a shallow dish-shaped recess which will hold the parts to the desired shape as they are glued.

Each of the rods in the go-bar deck exerts a force of approximately three pounds so in the photograph showing the rosewood bridge plate being glued into place, the twenty rods are exerting some 60 pounds of force on this small vital component. After passing through holes in the bridge, the strings are anchored to this bridge plate by the tapered bridge pins. Strength and good acoustic coupling are essential hence the use of a thin piece of dense rosewood.

By the end of the day the three main components of the sound box have been reinforced and the desired gentle curvature built in to enhance strength and sound projection. The next stage will involve carefully shaping the braces to remove as much weight as possible without compromising strength unduly. This process will require a delicate touch and feel.

Monday, July 6, 2009


Day 1: Top, Back and Sides

The traditional wood for the soundboard is sitka spruce, chosen for its straight, even grain and high strength to weight ratio. It will have to withstand over 100 lbs of pull when the strings are brought up to pitch. The top is thus in a fairly highly stressed state and sensitive to the vibrations of the strings. When finished it will be a little over one tenth of an inch thick with some thin braces or ribs on the back to add strength. This is the main source of the guitar's sound. A heavy top will be unresponsive and the guitar won't have good tone. Too flimsy a top will not withstand the stress of the strings and may warp or collapse. Manufactured guitars tend to be heavily built to withstand the wide range of humidity and general treatment to which they will be subjected.

The back and sides are generally made of a denser wood such as mahogany or rosewood. The role here is to support the soundboard and to resonate as it vibrates and amplify and reflect the sound through the soundhole.

Chuck has a good stash of mahogany and had sawn some to starting thickness for me to choose from. The individual boards are 'book sawn' in pairs such that when glued together along the long edge, the grain on one side should be a mirror image of that on the other. I chose a pair with an unusual band of darker grain running through it which caught my eye. The sides are similarly book sawn. The pair I chose had a nice upward sweep to the grain which should add visual interest to the end of the soundbox.

There are various ways to bend the sides. Chuck, being the engineer that he is, has come up with a very clever device. One side at a time is dampened then placed in the center of a five part sandwich with a layer of spring steel and a thermal blanket on each side. The layers are then placed in a jig, power turned on and when the water in the wood turns to steam, the sides can be bent and clamped to the jig without breaking. After a little more cooking they are allowed to cool and when removed they hold their shape.

The book sawn pairs for the back and top are glued along their long edge and then cut to shape and sanded to the desired thickness. Chuck helped me judge the end point by holding the board between finger and thumb, tapping it with a knuckle and listening to the resonance. It gets brighter as it gets thinner but there is a point of no return beyond which it won't be able to support the tension of the strings. I stopped sanding at around o.120 ". Once glued to the top of the guitar it will be thinned a little more around the edges of the lower bout which will allow it to vibrate more freely, rather like the cone of a speaker with its flexible surround.

The shaped sides are clamped into another jig and the end blocks are glued in place. We now have the main components of the sound box, ready for bracing and assembly tomorrow.

Sunday, July 5, 2009

This is my journal of an attempt to build an acoustic guitar. In a sense it began a long time ago in Ireland. I started playing guitar when I was at college in Belfast and soon got interested in guitar construction. I gathered what information I could from books and conversations with individuals who repaired or built guitars. Such people were few but did include George Lowden who started as a builder around that time and went on to gain an international reputation. Photographs of his guitars and construction techniques can be found at:


My own early attempts at construction included an electric bass guitar. I still have the major components of this unfinished project and a mould to shape and hold the sides of an acoustic guitar, which I never got around to starting. These reminders of unfulfilled ambition have followed me around for 36 years. if my current project is successful, I think I'll be able to let them go.

A couple of months ago I saw a posting on Craig's List from a guitar builder, Chuck Gilbert in Magnolia Texas, who offered the opportunity to build a guitar in his workshop, under his supervision. I visited Chuck a couple of times and was impressed with his guitars and his workshop so I signed up for the deal.

I start working with Chuck on Monday July 6th and plan to post an account of my progress with photographs over the following two weeks. It will be an interesting exercise. I hope to learn a lot and I'm looking forward to the challenge. Success will be easy to measure. If I complete a guitar it will have a voice of its own.