Wednesday, September 2, 2009

The Finish


I have added a photograph of the guitar some eight months after it was made. The spruce top has darkened considerably as the guitar ages. The difference in color is evident from comparison between the new photograph and those below. The sound has improved as the structure stabilizes and the guitar responds to regular playing.

The guitar is completed. Chuck did an excellent job of applying a lacquer finish. This, a time consuming process, involved sealing the grain, sanding, applying wash coats of sealer then several build coats of lacquer. These are allowed to cure, then leveled. Additional coats are applied and the curing and leveling process repeated followed by the final rub out and polishing. The neck is left with a satin finish which is pleasant to the touch.

The outcome can be seen in the photographs (double click to enlarge). Chuck is a perfectionist and went to a lot of trouble to achieve a high quality outcome. He took extra care to drop fill a section of the purfling that was absorbing lacquer, followed by a repeat of part of the build and leveling process. I think he takes almost as much pride in this guitar as I do.

Having had some time to play and examine the guitar I am very pleased with the outcome. The woods are not exotic by any means, and the slightly knotty grain in the mahogany back and gently curved grain in the sides might not conform to the unblemished symmetry which is popular in commercial guitars. However, they reflect personal choices and together with the transparent natural finish contribute to the instrument's unique character. Tonally it is the equal of several high quality acoustic guitars I have acquired over the years and will improve with time as the woods settle and the act of playing enhances the instruments resonance. I am pleasantly surprised with what I was able to achieve at a first attempt. Chuck's process and guidance helped me build to a standard that would otherwise have required many attempts and a gradual learning curve. Instead I was able to concentrate on the fundamental skills required at each stage. Could I do better and will I build another guitar? That remains to be seen. For the time being I am looking forward to enjoying a fine instrument with special significance. All that remains now if for me to design a label and glue that inside the soundbox of the guitar. I'll probably wait until I'm putting on a fresh set of strings.

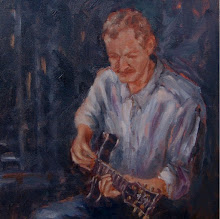
I have included a low resolution video of me playing the guitar. The tune is Si Bheag, Si Mhor, by the 17th Century Irish Harpist, Turlough O'Carolan. This one's for Seamus.


Sunday, July 19, 2009


Reflections and such.

It has been a very interesting and fulfilling two weeks. The 80 hours or so I spent on this project was as focused and intense an activity as any I've engaged in in quite a while. There were few distractions and the detailed work demanded a high level of concentration. Unlike much of the work I have done during my career, this endeavor results in a visible, tangible product which will also have a unique musical voice. It's a lot of things coming together in a very holistic fashion and it has brought closure to something I dabbled in over thirty years ago. Working with wood is both challenging and satisfying. Process and precision are the foundation, however, feel and a good eye are key aspects to the quality of the outcome. I know that playing a guitar which I've built myself will add to the enjoyment.

That a lot was achieved owes much to Chuck's support. He has the experience of having built some 25 guitars but beyond that his approach is that of an engineer. He is process oriented. He measures, thinks and makes adjustments to the process with the result that I encountered no serious oversights or setbacks. He was patient and open with his advice and access to his tools, even his fine quality chisels.

Chuck clearly has a passion for what he does. He studies guitar building and has taken a workshop class from Charles Fox, a renowned luthier in Portland, Oregon. He exchanges ideas with other luthiers including Howard Klepper and Kent Everett (see links below).

I came across Chuck's offer to steer someone through the process of building a guitar on Craig's list. I was fortunate to be in a position to be able to dedicate two weeks of my time and as mentioned above, it was full time work for those two weeks. I worked one short day because of a prior business commitment, however, I worked two long days to make up for it.

If you are interested in finding out more about Chuck's guitars or taking a construction class similar to that described in my blog, he can be contacted at:

cg3167@swbell.net

Links to other luthiers:


Friday, July 17, 2009


Day 10: From now on it will only get better

I took the guitar home yesterday evening in its temporarily assembled state. This gave me an opportunity to assess it as a complete musical instrument rather than the component parts which I have been working on for almost two weeks. I decided that the neck still doesn't have the perfect feel which I am seeking so in the morning I remove it and go back to carving and shaping. This reduces the thickness in the playing area by a little over a tenth of an inch. The heel and volute must then be modified so that all the compound curves blend together elegantly again. I am very satisfied with the result.

To protect the heel where the neck joins the body, and blend in with the body binding at the point of contact, I add a thin piece of ebony.

The remainder of the time is spent learning and performing detailed set-up work. Chuck's approach is characteristically precise so I take some notes which will allow me to better set up my own guitars. The angle at which the neck joins the body is modified very slightly to change the line of projection from fretboard to bridge. The nut and saddle are modified to adjust the height of individual strings above the fretboard and the truss rod is tensioned to counteract the pull of the strings and impart a very slight curvature to the fretboard to preclude string buzz. When reassembled this time the guitar not only sounds good but plays easily. The construction is essentially finished except for the permanent installation of the bridge. This is left till after the finish is applied.

The quality of the guitar has exceeded my expectations and is worthy of a professional finish so I'm having Chuck do the finishing work for me. This involves several coats of lacquer with waiting periods between times for the lacquer to cure. Multiple sandings, polishing and buffing follow until the body has a high gloss. The neck will be left with a satin finish which is more practical from a playing perspective.

Finishing will take approximately one month. I reluctantly leave the guitar but look forward to seeing the result of Chuck's efforts.

Check in tomorrow for reflections and final comments.

Thursday, July 16, 2009


Day 9: The candle trick, Irish bling and the guitar speaks.

The candle trick is a convincing demonstration of my earlier statement that the binding not only enhances the guitar's appearance but adds to the the structural integrity and sonic efficiency of the soundbox. The trick involves placing a lit candle close to the soundbox and giving the top of the guitar a sharp tap with a knuckle in the area where the bridge will be mounted. Before the binding was installed, this caused the flame to flicker wildly but when the test was repeated this morning the flame was snuffed with ease.

Ornamentation beyond the traditional position dots and sound hole decoration generally consists of the manufacturer's name or logo. I have decided to inlay a simple Celtic knot in the headstock. I mail ordered the knot, hand-cut from abalone in three interlocking pieces. Installation involves routing and carving a corresponding slot in the ebony face plate. This is delicate work and absolute precision is impossible. The small gaps left when the abalone is in place are filled with ebony sawdust and CA glue. When sanded this mix is an almost perfect match with the surrounding ebony. The slight asymmetry resulting from the knot being hand cut adds a certain uniqueness to the overall effect. Tuning machines are installed to complete the headstock.

The guitar's bridge is cut and carved from an ebony blank. Holes are drilled for the strings and bridge pins, and a slot routed for the bone saddle on which the strings will seat. A bone nut is made for the top of the neck and the parts of the guitar are ready for a preliminary assembly and testing. Hollow bolts through the bridge allow the guitar to be strung before the bridge is permanently installed. The stings are fed from inside the soundbox up through the hollow bolts, along the neck over the nut and to the tuners. This temporary configuration allows the guitar to be tuned up to pitch and checked out thoroughly prior to final setup. It is an opportunity to play the guitar. Chuck and I try it out. The guitar is light and responsive. Volume sustain and tone are excellent. Even in its unfinished state it is evident that I have the makings of a very high quality guitar. We are well pleased.

The major structural tasks are all completed and tomorrow will be spent making minor adjustments. I will again be in the enviable position of being able to tweak the guitar to suit personal preferences.

Wednesday, July 15, 2009


Day 8: Fitting and fretting.

Chuck's guitar building process is an exacting one, designed to produce repeatable results. The various jigs and templates used during the separate construction of the body and neck help ensure that when joined, they are aligned in the intended manner.  The fundamental fit must be close. There is some room for adjustment but not much. This is further complicated by the fact that the end and top of the guitar are curved where the neck will be attached. 

The top is sanded flat where the fretboard extension will lie and a mortice recess routed to accept the fretboard extension block. The heel of the neck is marked and chiseled to the shape and angle needed for a snug fit with the body and holes are bored for threaded inserts for bolts. Most builders now use bolt on necks which can be easily adjusted throughout the life of the guitar. Traditional glued dovetail joints tend to gradually shift with time and a neck reset in this case is a major repair task. High temperature softens glue and with the constant tension from the strings, a slight shift in the set of the neck over time can result in the guitar's action or playability being compromised. According to Chuck, one hour at 120 degrees can destroy a guitar, a situation which could easily occur if it is left in a car trunk in summer in Texas.

The neck is bolted onto the body for the first time of many checks and minor adjustments. A jig is used to check alignment between the axis of the neck and the center line of the body - it is good. A straight edge is used to project the line of fretboard to a temporarily attached bridge to ensure that the tilt of the neck is accurate so that the 'action', the relationship between strings, fretboard and bridge can be set to close tolerances. The parts are disassembled and minor adjustments made with chisel and sandpaper until everything fits just right.

Now it's time to put the nickel silver frets in the fretboard. Here again Chuck doesn't do things by half. His approach involves filing and polishing the fret ends to a hemispherical shape rather than the more common flat taper. This involves cutting and preparing the frets to an accuracy of 0.005" before hammering them into the fretboard. Because of the taper of the fretboard, each one is different so this is a slow process which takes me approximately six hours.

Finally the neck is bolted to the body, this time just for effect. It's beginning to look like a guitar!

Tuesday, July 14, 2009


Day 7: Painstaking purfling and banding

Several aspects of guitar design combine aesthetic and functional purpose. The edges of the soundbox would be vulnerable to damage, particularly the relatively soft spruce top. Most guitar soundboxes are therefore trimmed with a harder material, generally plastic or wood. The hard edging not only protects the guitar but enhances the resonance by reflecting vibrations, thus increasing the length of time a note is sustained. More elaborate guitars often have ornamental strips of purfling adjacent to the binding. Thin strips of different colored woods are traditional although some high-end guitars have more intricate marquetry inlays or abalone shell.

Chuck's recent designs include an ebony banding strip and purfling made of thin laminated strips of contrasting ebony and maple for an elegant, traditional look.

Fitting the banding and purfling is painstaking work. First grooves of the required depth and profile are routed around the top and bottom of the soundbox. The first strip of purfling is then dry fitted and tacked with CA adhesive to hold it in place. The banding and the top strip of purfling are then dry fitted and taped in place. This involves some delicate work to ensure that the ends fit neatly, including some small miter joints where the horizontal purfling intersects the bands of purfling previously fitted alongside the tapered ebony end graft (double-click on the second from bottom photograph to see detail).

Once everything has been carefully fitted and taped, the trim is glued. Cleanup involves sanding and scraping the binding and purfling till it is flush with the sides, top and bottom of the body. Finishing will further enhance the appearance, however even in its unfinished state, the effect is pleasing. This is the most intricate piece of carpentry I have ever attempted.

Monday, July 13, 2009


Day 6: Getting to grips with the neck.

The neck is a key structural component and must, for the life of the guitar, bear a constant 100 pounds or so of pull from tuned strings. It is also the primary area of physical contact between the player and the instrument.

I have several guitars. No two necks are the same. Some are wider than others, some thicker, different cross-sectional profiles, different shapes where the neck joins the body and headstock and so on. Over a period of a few days I can adjust to a particular neck and feel comfortable with it, however, today I have an opportunity to create the perfect neck. One which is a natural and unique fit to the size and shape of my left hand. One which requires no mental adjustment or compromise on my part. It remains to be seen if my carving skills are up to the task and my ability to judge when the neck 'feels' right.

The work begins with rough carving of the neck blank to which the fretboard and headstock veneer have been glued. Measurements and templates are used to establish some approximate dimensions at three points along the neck which allows for fairly aggressive removal of wood between with spokeshave and rasp. As the work progresses small planes and chisels are used and gradually the hand tools give way to sandpaper wrapped round blocks of wood and dowels of various sizes.

The heel of the guitar, where it will join the body, is carved such that the functional part of the neck transitions into a graceful ornamental shape consistent with the overall dimensions and style of the instrument. The laminated center strip serves as a guide to symmetry. At the headstock end, a volute or raised shape is carved for reasons both aesthetic and functional. It adds visual balance and provides the player with tangible indication of the location of the first fret. It also adds strength to an inherently vulnerable part of the guitar where the angled headstock meets the narrowest part of the neck.

When approaching the desired shape, touch replaces sight as the primary means of assessing and making minor adjustments. It feels good. I look forward to checking it with a fresh mind in the morning to see how close I am to having achieved my goal.


Friday, July 10, 2009


Day 5: Look no hands!

Of the many jigs and devices Chuck has built to facilitate the guitar construction process the vacuum powered ones are perhaps the most impressive. To glue the back and sides together the back is placed against a rubber gasket in a concave piece of MDF which conforms to the built-in curvature. A vacuum pump below the bench is turned on and as the air is evacuated the back becomes firmly held in the jig. The sides are then glued and clamped in place. The jig is a convenient height so the clamps slip neatly under the assembly. If you look closely at the bottom of this first photograph you'll see a round rubber gasket in a wooden plate on the side of the bench. This is another of these vacuum jigs. More on this later.

The process for the front is similar. It is placed in the jig and after one last examination and final clean up of the inside work, the back and sides are glued and clamped on top. The sound box is now closed and any future access will have to be through the sound hole.

While the glue is setting, the fretboard is drilled for the small abalone dots which will help the player navigate the scale. The neck blank consists of a laminated block of mahogany and maple which adds strength and will result in an attractive skunk stripe down the back. This will prove a useful guide to symmetry when carving the neck to shape.

The neck is further strengthened by adding two strips of carbon fiber for stiffness and an adjustable truss rod which, by means of a nut at the end, can be placed in tension or compression and thereby impart a slight curvature to the neck. This is used to balance the permanent tension from the strings resulting in a slimmer more elegant neck.

When the glue has hardened on the sound box the edges are trimmed on a table router and it is placed against the vertical vacuum jig mentioned above. When the pump is turned on it is held firmly in the desired position for sanding or chisel work. No clamps, no vices, no slips. It's almost as good as a second pair of hands.

Back to the neck. After the truss rod is glued in place with a wooden gusset above it to hold it in the groove, the surplus wood is chiseled off and the fretboard and carbon strips are glued in place.

The guitar now consists of two components rather than the multiple pieces of wood of five days ago. There are crucial stages still ahead, however, I am pleased with progress and the process in general is working well. Chuck's approach is to explain the tasks and where necessary demonstrate the skills needed for each stage. In pointing out some of the pitfalls, he often says "ask me how I know". He gives me the benefit of his knowledge and experience and the use of the many clever jigs and devices so I can concentrate on the quality of my work. Although I haven't used hand tools for a long time, my intrinsic skills are proving to be up to the challenges faced so far and are improving with practice. Carving the neck will put my skills to the test.


Thursday, July 9, 2009


Day 4: The Fretboard - where the action is

Today was a short day so I set the soundbox aside and started work on the fretboard. The fretboard has to stand up to contact from fingers and steel strings, including the sideways bending of strings to achieve vibrato or a change in the pitch of a played note. The latter effect is characteristic of blues guitar. The fretboard material must therefore be hard and durable. Ebony and rosewood are the traditional choices. I selected one of three available African ebony blanks based upon subtle grain patterns and color variations which can only be seen upon close inspection.

Precise positioning of the frets is important, otherwise the guitar will not play in tune up and down the neck. The scale length in this case is going to be 25.4", and Chuck has a jig which is used to ensure the exact spacing required when cutting the slots in the fretboard. The ebony blank is stuck to the underside of a plexiglass template with two sided tape. This is placed on the jig which is then slid over the table saw with a 0.025 blade set to a height which will cut a slot part way through the fretboard. The plexiglass template is then shifted until the next notch mates with a pin on the jig and the process is repeated until all the slots are cut.

The sides of the fretboard are cut to a taper and small strips of ebony glued to each side so that the slots are not visible at the edges of the fretboard. This will give a pleasant smoothness and feel to the edges of the finished fretboard.

Classic guitar fretboards are flat, steel string guitar fretboards generally have a gentle curvature to them. Chuck doesn't do things by half. He makes fretboards with a compound curvature - 12" radius at the narrow end and 16" at the wide end. He has another jig for this of course. The fretboard is mounted on a cradle with double sided tape. This cradle rolls on two pieces of wood with the necessary curvature and a hand held router makes several passes over the fretboard as the cradle is moved and locked incrementally across the jig. When finished the fretboard has the desired curvature and the ebony bindings on the sides have blended in so that the fret slots appear to start and end within the fretboard.

Wednesday, July 8, 2009


Day 3: Sharp tools and a feel for the grain.

There's a knack to sharpening a chisel and indeed to knowing when it needs another touch on the sharpening stone to restore its edge. Good chisels take a good edge and hold it longer. Chuck has a neat trick for quickly honing a chisel. He makes a few passes on the sharpening stone and finishes off by holding the edge against a small buffing wheel with some polishing compound on it. It's quick and very effective.

Mass is the enemy of vibration so today's objective was to remove as much of the mass of the strengthening bars and struts as possible. In the case of the guitar back, which reflects and amplifies sound, the approach is to scallop the ends of the struts where they will meet the sides of the guitar, thus leaving the back freer to vibrate. More wood is removed by carving the struts to a parabolic cross section. This all involves a good deal of feel and individual judgement as to symmetry and aesthetics. It is finished when it looks and feels 'right'.

The process for the front is more sophisticated, since this is where the guitar's tone and timbre are generated. Front bracing patterns have been developed over the years largely on an empirical basis. Most classical guitars follow the designs developed by Antonio de Torres a nineteenth century builder who is as revered among classical guitarists as Antonio Stradavari is among violinists. Steel string guitars generally borrow from designs developed by Christian Fredrick Martin which also date back to the early nineteenth century.

The front braces and tone bars are scalloped. The idea is to leave mass in areas of the sound board where there are natural nodes or areas of little vibration and remove as much mass as possible from parts of the soundboard that are trying to vibrate. This is a trial and error approach. Chuck knows from prior art and his own experience of guitar building roughly where the nodes or dead spots are likely to be. I leave the bars high at these spots and remove wood between them. We check progress by holding the soundboard between finger and thumb and tapping it in the vicinity of the bridge plate. As wood is removed, the sound becomes clearer, more musical and sustains longer. Wood is removed and the results assessed until further removal seems to have little effect. This is called voicing the guitar.

Since the front and back of the guitar were built to curvatures of 25' and 12' respectively, the top and bottom of the sides must conform to the same curvatures to ensure a good fit and a structurally strong soundbox. The same dished pieces of MDF (medium density fiberboard) are used, this time with a sheet of coarse sandpaper in place. The edges of the sides are chalked and sanded until all the chalk is removed.

To finish off the struts, both front and back, the ends are shaved down or feathered so that they give the appearance of disappearing at the points of intersection with the sides. It's a tricky process. Fortunately I've had a good deal of carving practice by this time so the delicate work proceeds without mishap. The results are subjected to the 'paper test'. A piece of paper is slipped under the side of the guitar adjacent to the strut. Gentle pressure is applied to the side above the strut and the paper should be held firmly indicating that there is full contact between back and sides at that point.

After some sanding the three primary sound box components are completed and ready for assembly. My Marples Sheffield steel chisels were put to good use today. They have waited a long time to fulfill the purpose for which they were bought in Belfast over thirty years ago.